- Visibility 60 Views
- Downloads 5 Downloads
- DOI 10.18231/j.jds.2022.013
-
CrossMark
- Citation
Ceramic cantilever bridge: A simplified clinical technique
Introduction
The front missing tooth is a real challenge for a dental surgeon, it has to restore the function and esthetic of the front tooth especially when it comes to young subjects, where the implant treatment must be postponed until the patient becomes an adult.
A fixed prosthesis restoration, such as a conventional bridge or a resin bonded bridge (metallic resin bonded bridge or ceramic resin bonded bridge) are the preferred treatment.
Due to the evolution in bonding adhesives, as well as an increasing concern for tissue preservation, the cantilever bonded bridge has found its place in modern dentistry. [1]
Historical overview
The conventional bonded bridge with metal framework is placed on both sides of the pontic on the palatal or lingual surfaces of the teeth
This type of prosthetic was described for the first time by Rochette in 1973,[2] where its infrastructure was made of metal. In 1997, it was introduced in ceramics by kern and Glaser.[3]
In 1981, a new configuration requiring only a single retainer was introduced by Hopkins[4] and was known since then as the cantilever bridge.
According to the Glossary of Prosthodontics Terms, the cantilever fixed dental prosthesis or cantilever bridge is a fixed complete or partial denture in which the pontic is cantilevered and retained and supported by one or more abutments.[5]
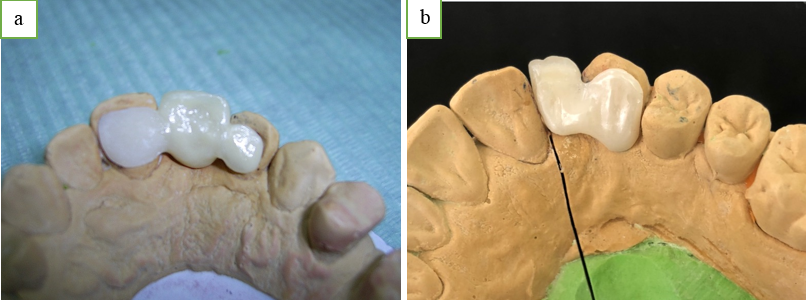
The cantilever bridge is therefore a plural fixed prosthesis whose pontic replacing the missing tooth is cantilevered. There is no support below the pontic in extension, it is linked to a single wing bonded to the lingual surface of the abutment tooth bordering the gap ([Figure 1]).


Biomechanics
The support tooth undergoes pressures coming from the element in extension. It acts as a bending lever under the action of occlusal forces.
In vitro, the fatigue resistance of bonded bridges with a single wing is greater than the one with two wings. [6]
Also, mobility occurs on a single and unique axis with the cantilever bonded bridge. The bridge constraints are reduced, and the patient's proprioception seems to be improved.
Abutment Selection Criteria
It’s very important to select the right scenario for a cantilever bonded bridge, it’s mostly responsible of the success or the failure of this procedure.
Investigation should be conducted while choosing the abutment teeth, to ensure endodontic and periodontal health. A careful assessment of both static and dynamic occlusal relationships is vital to optimize success. A wax up on articulated casts can be used to get a better perspective from the palatal side, which helps in determining the amount of interocclusal space available for the bridge wings and pontics.
The selection of the abutment tooth depends on 5 parameters ([Table 1])
Clinical Realization
The gum preparation or pink preparation:
The aesthetic integration of a cantilever bridge requires creating the illusion that the prosthetic crown emerges from a root.
The practitioner can reshape the edentulous ridge by adding or subtracting bone or mucosa. Scraping off plaster from the casts is prohibited because it would cause an over pressure of the pontic on the patient's gums.
Soft tissue thickness is measured with a periodontal probe between the mucosa and the ridge limit. A retro alveolar radiograph may also be taken. If the variation in tissue volume is not too great and the thickness of the gum exceeds 3mm, the practitioner can model the edentulous ridge by tissue subtraction.
The cervical limit of the pontic collar is marked with a marker to guide the dentist, then the soft tissues are shaped with a ball diamond bur to create a crater.
Gingivectomy can also be performed with a cold blade, electrosurgery, carbon dioxide or diode laser. Tissues are more stable, and healing is improved after laser gingivectomy. (Tirlet et Attal JP, 2015).[7]
Pseudo-papillae, and zenith point are therefore created as a result of this modeling of the gingival margin.
The aim of the preparation is to provide a sufficient and homogeneous volume for the ceramic ensuring optimal mechanical and aesthetic features also to allow a precise insertion of the restoration.
Temporization of soft tissues
As a temporary, a clear dental splint is used with an acrylic resin tooth or filled with flow composite is placed at the end of the gum preparation. It allows the gum to make a «guided tissue healing» and keeps the created pseudo-papillae it is usually left 10 to 15 days. The composite must be perfectly polished to have good tissue healing. [7]
|
Abutment selection criteria |
|
|
Bonding surface |
The central incisor is preferable, then the canine and finally the lateral incisor |
|
Previous restoration |
Preferentially a tooth free from restoration |
|
Occlusion |
The reconstruction of the bridge makes it possible to create contacts and restore occlusion. Its preferable that the pontic tooth doesn’t have contact in occlusion |
|
Risk of recurrence |
In case of mobility, diastema between the central and lateral incisor should be avoided. A diastema between the lateral and the canine is less harmful; Therefore, to replace a lateral incisor, we prefer to use the central incisor. And to replace a central incisor we use the contralateral central incisor |
|
Passive eruption |
The abutment tooth must have finished its eruption. It is most often the central incisor in adolescents and not the canine |
|
Cantilever bridge tooth preparation |
|
|
Minimal Enamel palatal preparation: |
Preparation of cervical abutment: the palatal preparation is limited in the enamel. We seek to obtain the largest enamel surface to improve bonding. The preparation must be 0,5mm if we are using zirconia, and 0.8 to 1 mm if its lithium disilicate ceramic. The occlusal limit should not be located near to the area of high translucency on the coronary edge. This limit must not exceed the line of translucency and be below it to allow the diffusion of light and not alter the aesthetics. We will be particularly vigilant when the abutment is a central incisor, canines are less affected by this problem. The preparation must be located supragingivally, it makes the bonding steps easier in a dry area, using a rubber dam. The practitioner can mark the area not to be crossed with a marker. So, the palatal preparation must cover the widest surface possible to optimize bonding once again. Also, to oppose the forces of cleavage and peeling of the bonded joint.[8] |
|
Preparation of proximal box |
A proximal box is made in extension of the preparation in the toothless area, it is oblique to the axis of the abutment tooth. Therefor the free edge won’t be damaged during the preparation and not to modify its translucency. It shouldn’t be extended to the third of the proximal surface. The proximal box should be 4 mm high and 3 mm wide, it is surface is 12mm2 if we opt for lithium disilicate ceramic because the connection of the bonded bridge is its weak point. But if we don’t have enough surface, we opt for an armature in zirconia 3 mm high and 2-3mm wide (6-9mm2). If we have less surface we opt for metal infrastructure.[7], [9], [8], [10] |
|
Secondary retention |
Secondary retention can be obtained by making small coves. Kern proposes to perform it next to the missing teeth area[11] while Tirlet and Attal [12] place it opposite side of the missing teeth. It is located away from the pulp area. This technic allows stabilization and retention of the bridge. It avoids the risk of rotation of the bridge. It opposes the lever arm due to the forces applied to the element in extension. Cingulum or proximal grooves can be made, they ensure the stability, retention, and support of the restoration. [12] |
|
Lithium disilicate Ceramics |
Zirconia |
|
Bonding of a lithium disilicate bonded bridge (IPS Emax, Ivoclar) has the same clinical procedure as partial restorations: orthophosphoric acid cleaning after the final clinical try-in of the bridge to remove bacterial contaminants from the wing inner surface. Etching with hydrofluoric acid (4-9%) for 20 seconds of the ceramic wing inner surface, rinsing and drying, finally silane deposit and wait about 3 minutes. |
this non-glass cannot be etched and bonded. After try-in and cleaning with alcohol, the zirconia primer is placed into the restorations and then dried. |
|
Tooth surface conditioning |
|
|
orthophosphoric acid etching 30 seconds for the email and 15 seconds for the dentin under rubber dam, dental bonding adhesive is then applied, air-thinned, and dual-cure composite luting material is applied onto the teeth and the cantilever bridge wing were seated. A Clean-up is done with brushes, finally curing for 40s from both lingual and facial. |
Tooth preparation
According to Shillingburg, the preparation principles are: [9] Tissue economy, retention and stabilization of the reconstruction, the durability over time and the precision of the abutment preparation limit ([Table 2])
Impression
When the preparation is finished, a one-step impression is taken, the longevity of the bonded bridge depends on the quality of the impression and the quality of the prothesis inner side.
Bonding steps
It is necessary to recheck the perfect adaptation of the bridge before bonding. The problem arises of the choice between the different possibilities we have ([Table 3]).
Maintenance
The bonded bridge's maintenance is a simple procedure. Cleaning around the bridge with regular and inter-proximal brushes, as well as flossing, is usually recommended. Bridges are also checked on a regular basis as a part of routine checkups.
Conclusion
A single retainer ceramic resin-bonded bridge is an ideal interim fixed dental prosthesis therapy. It can also be employed as a long-term restoration approach, if an appropriate enamel structure is available and adequate framework dimensions are provided, also adhesive cementation procedures are methodically done.
The clinician must make suitable case selections, provide proper treatment planning, and guarantee that treatment is carried out to a high standard, are the success key to this type of fixed prothesis. The clinician must keep in mind that maintenance is essential to guaranty the best chance of effectiveness of the prothesis.
Conflict of Interest
The authors declare no relevant conflicts of interest.
Source of Funding
None.
References
- N U Zitzmann, M Özcan, S S Scherrer, J M Bühler, R Weiger, G Krastl. Resin-bonded restorations: a strategy for managing anterior tooth loss in adolescence. J Prosthet Dent 2015. [Google Scholar]
- A Rochette. Attachment of a splint to enamel of lower anterior teeth. J Prosthet Dent 1973. [Google Scholar] [Crossref]
- M Kern, R Gläser. Cantilevered all- ceramic, resinbonded fixed partial dentures: a new treatment modality. J Esthet Dent 1997. [Google Scholar] [Crossref]
- C Hopkins. An immediate cantilever Rochette bridge. Br Dent J 1981. [Google Scholar] [Crossref]
- . The Glossary of Prosthodontic Terms: Ninth Edition. J Prosthet Dent 2017. [Google Scholar] [Crossref]
- TL Wong, MG Botelho. The fatigue bond strength of fixed-fixed versus cantilever resin-bonded partial fixed dental prostheses. J Prosthet Dent 2013. [Google Scholar] [Crossref]
- G Tirlet, J P Attal. Les bridges collés cantilever en vitrocéramique renforcée au disilicate de lithium raisons du choix et mise en oeuvre clinique, réalités. Cliniques 2015. [Google Scholar]
- S Wolfart, S Eschbach, S Scherrer, M Kern. Clinical outcome of three-unit lithium-disili- cate glass-ceramic xed den- tal prostheses: up to 8 years results. Dent Mater 2009. [Google Scholar] [Crossref]
- H T Shillingburg. Fundamentals of fixed prosthodontics. 1997. [Google Scholar]
- M Kern. RBFDPs. Resin-Bonded Fixed Dental Prostheses - Minimally Invasive Esthetic Reliable, 1st Edn.. 2017. [Google Scholar]
- M Kern, N Passia, M Sasse, C Yazigi. Ten-year outcome of zirconia ceramic cantilever resin-bonded fixed dental prostheses and the influence of the reasons for missing incisors. 2017. [Google Scholar] [Crossref]
- J P Attal, G Tirlet. Le cantilever : une nouvelle géométrie pour les bridges collés. Revue de la littérature. Réal Clin 2015. [Google Scholar]
